Frequently Asked Questions

  1. The inside of the wiper arm head is smooth. Shouldn’t there be grooves in it to mate with the wiper spindle?
    The material used for the wiper head is softer than the stainless steel spindle. The grooves on the spindle, also known as splines or knurls, are sharp enough to dig into the wiper head and cut its own grooves. This assures a long term non – slip fit.
  2. How is a wiper arm installed?
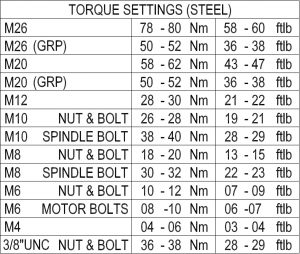
    There are a few things to be aware of when installing a wiper arm. Safety first! If your wiper motors are connected electrically, and you physically move the wiper mechanism out of its “rest” (park, as we call it) position, the wiper system will come on and cycle once and re-park.  So, before you disconnect the wiper electrically, you need to know where the wiper arm will park. You can do this by either marking a line on the end on the spindle, or wrapping the spindle with tape, as shown in the picture below.  Run the motor, and observe its motion, paying attention to the direction it moves and where it stops. Disconnect the electrical feed to the motor. Place the arm on the side of the window you plan it to park on, making sure that the motor will rotate in the proper direction to sweep the glass. Place the arm over the spindles and place a block of wood between the wiper blade and the glass to raise the arms to be at a right angle to the spindle. This helps to take some of the spring pressure off of the arm for installation. Push the arm heads onto the spindles until they are fully seated. Place a washer and nut onto the spindle, and tighten to the torque setting chart above. Reconnect the motor, and observe the operation to make sure it sweeps the way you intended it to. If not, make the necessary adjustments by altering the park position (requires removing and re-installing the arms) or adjusting the sweep angle.
  3. The wiper arm is difficult to remove, once it’s been on for a while. How do I remove it?
    We make a tool just for this!  You can purchase a Wiper Arm Extractor from us or, follow these instructions:
    First remove the spindle nuts entirely. Place a block of wood between the glass and the wiper arm, near the middle of the blade. Using a screwdriver, pry bar, cat’s paw, or other similar prying device, gently pry the wiper drive arm head away from the spindle, using a wood block to prevent marring of the bulkhead surface. Work all the way around the spindle, until the arm head releases from the spindle. Repeat the procedure with the idler arm. Make sure to mark the position of the arm on the glass before you remove it, so that the existing or new arm can be put back in the same location. Wire brush the spindle of all loose material thoroughly before re-installing arm. Be sure to refer to the torque chart on this page for the proper torque setting for the wiper spindle nuts.
  4. The wiper blade isn’t parallel to the edge of the window. Can this be adjusted?
    On all arm models except for the P5 & P613 series, the blade can be rotated at the end of the arm, by loosening the blade clip bolts at the end of the arm, rotating the blade to the desired position, and re-tightening the blade clip bolts. Note that this procedure also changes the blade position on the opposite side of the window, which may interfere with the window edge. If the two sides of the window are not parallel, you may need to compromise with the adjustment for an average between the two sides. For the P5 & P613 series arms, the blade clip is fixed, and has no adjustment. The drive arm has a slotted bolt assembly, which allows some adjustment in the blade angle.
  5. How do I adjust the angle that the wiper linkage sweeps?
    On many of our systems, the angle can be adjusted by loosening the wiper variable – arc pin from its slot on the back side of the drive spindle weld assembly. Moving the pin away from the spindle narrows the arc, and moving it toward the spindle widens the arc. Once the desired setting is obtained, re-torque the securing nut into position according to the torque charts. Some of our systems (The 2NM and S612 series) do not have a continuous slot to for arc adjustments, and have a set amount of choices for arc changes (usually six choices). A few systems have no adjustment available in the arc setting, and were typically made this way at the builder’s request.
  6. I have noticed that there is moisture around the wiper motor, where is it coming from, and how do I repair it?
    During the original installation of the wiper motor, we have recommended the use of a high quality sealant to assure that moisture does not leak though the bulkhead. If the sealant was not liberally applied, or if it has become brittle, it may cause a leak. To determine if this is where the leak is coming from, there would be water marks on the bulkhead just below the wiper motor mounting bracket. To verify this, have an assistant spray water around the wiper spindles from the outside of the vessel, and watch for drips below the wiper mounting bracket. If a leak is detected using this method, then remove the wiper motor assembly, clean away any remaining sealant, reapply new sealant, and reinstall wiper motor. Replace rubber washers on both sides of the bulkhead, if found to be brittle.  Another possible area where leakage could occur is through the brass liners which house the wiper motor spindles. To detect this type of leakage, there would be water marks on the interior on the ends of the wiper brass liners. Spraying the spindles from the outside can again be used to confirm where the leak is. To repair this, replace the o-ring inside the outer end of the brass liner. It would be advisable to also replace the shim washers and circlip, along with the weather cap at the same time. See Hardware for the various parts available, or ask about the repair kits 1DRIVKIT (for drive assembly repair) and 1IDLERKIT (for idler assembly repair).
  7. I have a switch similar to your part 10166600, but it has 7 wires instead of 6. All of the wire colors are the same, except my switch has two red wires. Can I replace this switch with your part 10166600?
    Part 10166600 is an improved version of the older 7 wire switch. The two red wires are tied together when this switch is connected into the circuit, thus it only has six connections. The newer switch can directly replace the old switch. Connect it, color for color, exactly as the 7 wire switch was connected. One word of caution – some installations included a relay in the circuit between the switch and the wiper motor.  This relay must be removed and the harness wired straight through before installing the new 6 wire switch. After removing the relay, there should be 5 wires all the way from the switch to the wiper motor. The sixth wire (brown) is for the wash function, and goes to either a wash pump or solenoid valve. Leaving the relay in the circuit will cause the motor not function correctly such as running continuously, not parking, or not running at all.

Torque Setting Chart

Troubleshooting

Wipers won’t run – is it the switch, or the motor, or something else?

  1. Verify all wires are connected according to wiring diagram, and confirm there are no loose connections.
  2. Check switch by one of two methods – 1) Change the switch with one from another wiper, that is working properly.  If a different switch runs the motor properly, then the original switch is faulty, and needs to be replaced.  2) Connect positive and negative to the switch, and measure voltage output the for low and high speed. To check park, you should have continuity between the low speed output and the park wire when the switch is turned off.  If you have no voltage output for low and high speed, when the switch is turned on to these settings, then the switch is faulty and should be replaced. Also, if you have no continuity from the low speed and the park wire when the switch is turned off, then the switch is faulty and should be replaced.
  3. If switch tests properly, disconnect switch from motor, and test motor manually, according to instructions on drawing “Instructions for Running Motors Manually” (see below) . If motor does not run on low speed, high speed, and park properly, and positive voltage is verified at the motor, and ground is verified at the motor, then motor is faulty and requires replacement.
  4. If both motor and switch test correctly, then it is a wiring problem. It is probably better to replace the entire wiring circuit than to check for faults and shorts somewhere along the circuit. A local electrical supply company should have available all of the necessary wiring.